Navigation
Approve employee timesheet submission
Please follow these steps to approve your employee timesheet submission:
1. Login to Vstaff > Supervisor > Timesheet Pending to approve employee’s timesheet submission.

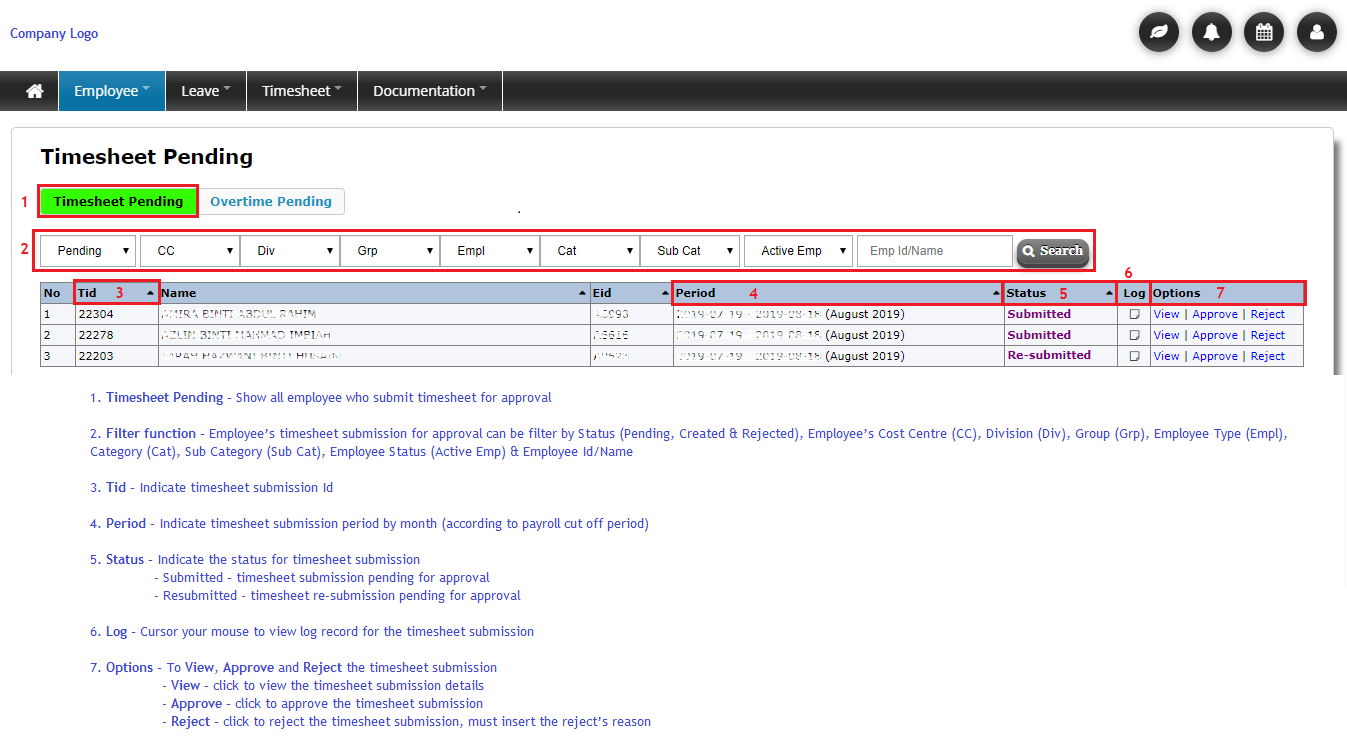
2. Click on Timesheet Pending tab. Explanation of the Timesheet Pending page:
1. Timesheet Pending – Show all employee who submit timesheet for approval
2. Filter function – Employee’s timesheet submission for approval can be filter by Status (Pending, Created & Rejected), Employee’s Cost Centre (CC), Division (Div), Group (Grp), Employee Type (Empl), Category (Cat), Sub Category (Sub Cat), Employee Status (Active Emp) & Employee Id/Name
3. Tid – Indicate timesheet submission Id
4. Period – Indicate timesheet submission period by month (according to payroll cut off period)
5. Status – Indicate the status for timesheet submission
- Submitted – timesheet submission pending for approval
- Resubmitted - timesheet re-submission pending for approval
6. Log – Cursor your mouse to view log record for the timesheet submission
7. Options – To View, Approve and Reject the timesheet submission
- View – click to view the timesheet submission details
- Approve – click to approve the timesheet submission
- Reject – click to reject the timesheet submission, must insert the reject’s reason
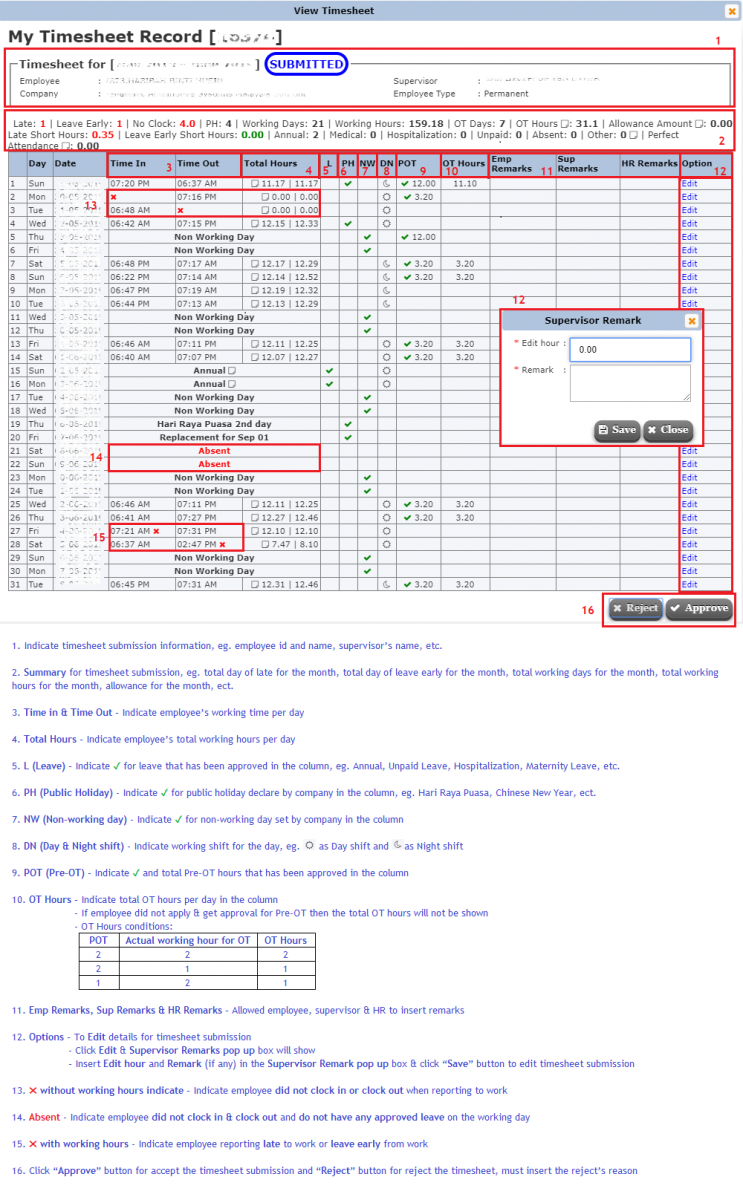
3. Click View at Option column to view timesheet details. The Explanation of the View Timesheet page:
1. Indicate timesheet submission information, eg. employee id and name, supervisor’s name, etc.
2. Summary for timesheet submission, eg. total day of late for the month, total day of leave early for the month, total working days for the month, total working hours for the month, allowance for the month, ect.
3. Time in & Time Out – Indicate employee’s working time per day
4. Total Hours – Indicate employee’s total working hours per day
5. L (Leave) – Indicate ✔ for leave that has been approved in the column, eg. Annual, Unpaid Leave, Hospitalization, Maternity Leave, etc.
6. PH (Public Holiday) - Indicate ✔ for public holiday declare by company in the column, eg. Hari Raya Puasa, Chinese New Year, ect.
7. NW (Non-working day) - Indicate ✔ for non-working day set by company in the column
8. DN (Day & Night shift) - Indicate working shift for the day, eg.  as Day shift and
  as Night shift
9. POT (Pre-OT) – Indicate ✔ and total Pre-OT hours that has been approved in the column
10. OT Hours – Indicate total OT hours per day in the column
- If employee did not apply & get approval for Pre-OT then the total OT hours will not be shown
- OT Hours conditions:
|
POT |
Actual working hour for OT |
OT Hours |
|
2 |
2 |
2 |
|
2 |
1 |
1 |
|
1 |
2 |
1 |
11. Emp Remarks, Sup Remarks & HR Remarks – Allowed employee, supervisor & HR to insert remarks
12. Options – To Edit details for timesheet submission
- Click Edit & Supervisor Remarks pop up box will show
– Insert Edit hour and Remark (if any) in the Supervisor Remark pop up box & click “Save” button to edit timesheet submission
13. ✖ without working hours indicate – Indicate employee did not clock in or clock out when reporting to work
14. Absent - Indicate employee did not clock in & clock out and do not have any approved leave on the working day
15. ✖ with working hours - Indicate employee reporting late to work or leave early from work
16. Click “Approve” button for accept the timesheet submission and “Reject” button for reject the timesheet, must insert the reject’s reason
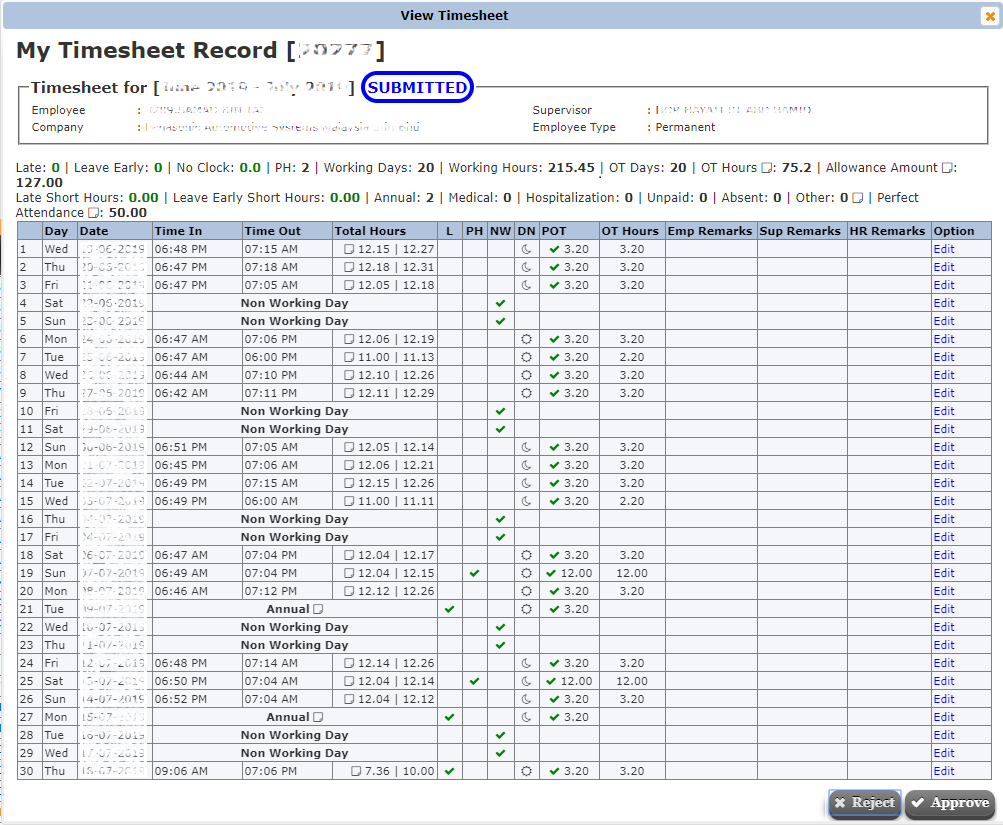
17. Example for completed timesheet submission
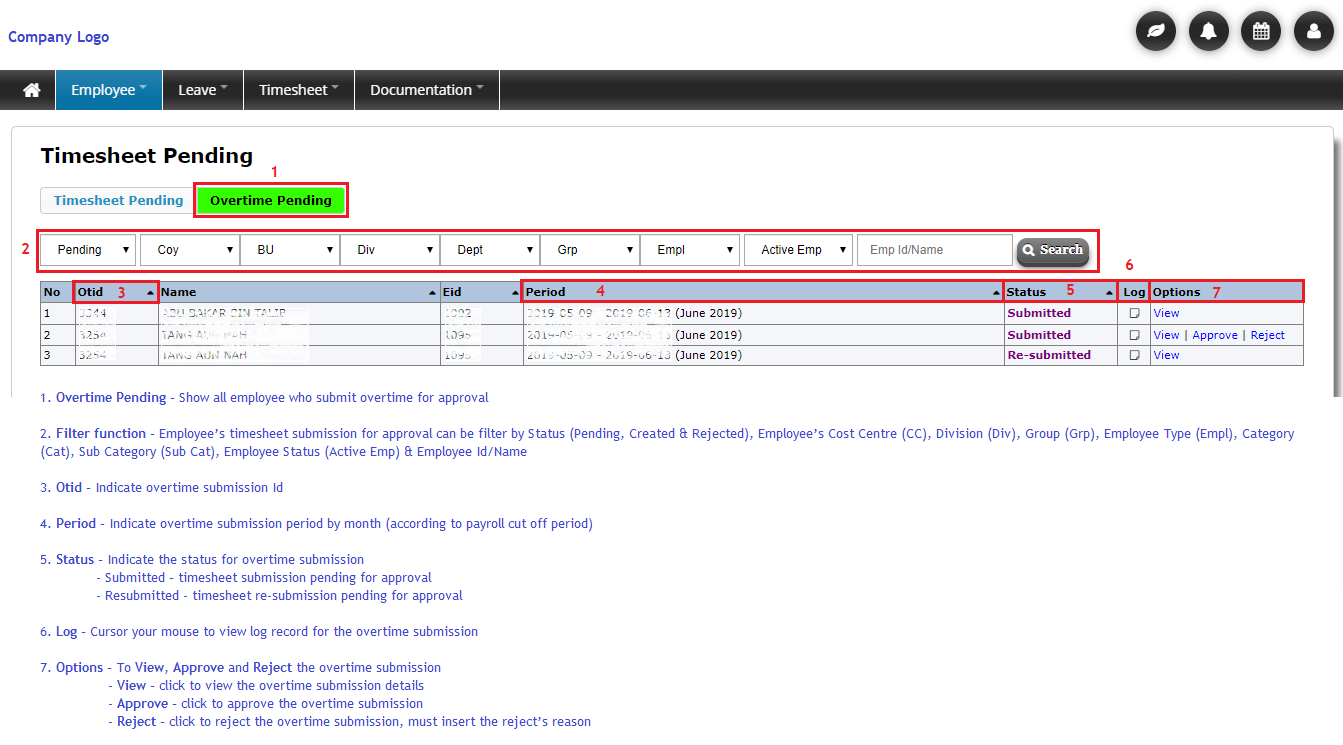
4. Click on Overtime Pending tab. Explanation of the Overtime Pending page: (If applicable)
1. Overtime Pending – Show all employee who submit overtime for approval
2. Filter function – Employee’s timesheet submission for approval can be filter by Status (Pending, Created & Rejected), Employee’s Cost Centre (CC), Division (Div), Group (Grp), Employee Type (Empl), Category (Cat), Sub Category (Sub Cat), Employee Status (Active Emp) & Employee Id/Name
3. Otid – Indicate overtime submission Id
4. Period – Indicate overtime submission period by month (according to payroll cut off period)
5. Status – Indicate the status for overtime submission
- Submitted – timesheet submission pending for approval
- Resubmitted - timesheet re-submission pending for approval
6. Log – Cursor your mouse to view log record for the overtime submission
7. Options – To View, Approve and Reject the overtime submission
- View – click to view the overtime submission details
- Approve – click to approve the overtime submission
- Reject – click to reject the overtime submission, must insert the reject’s reason
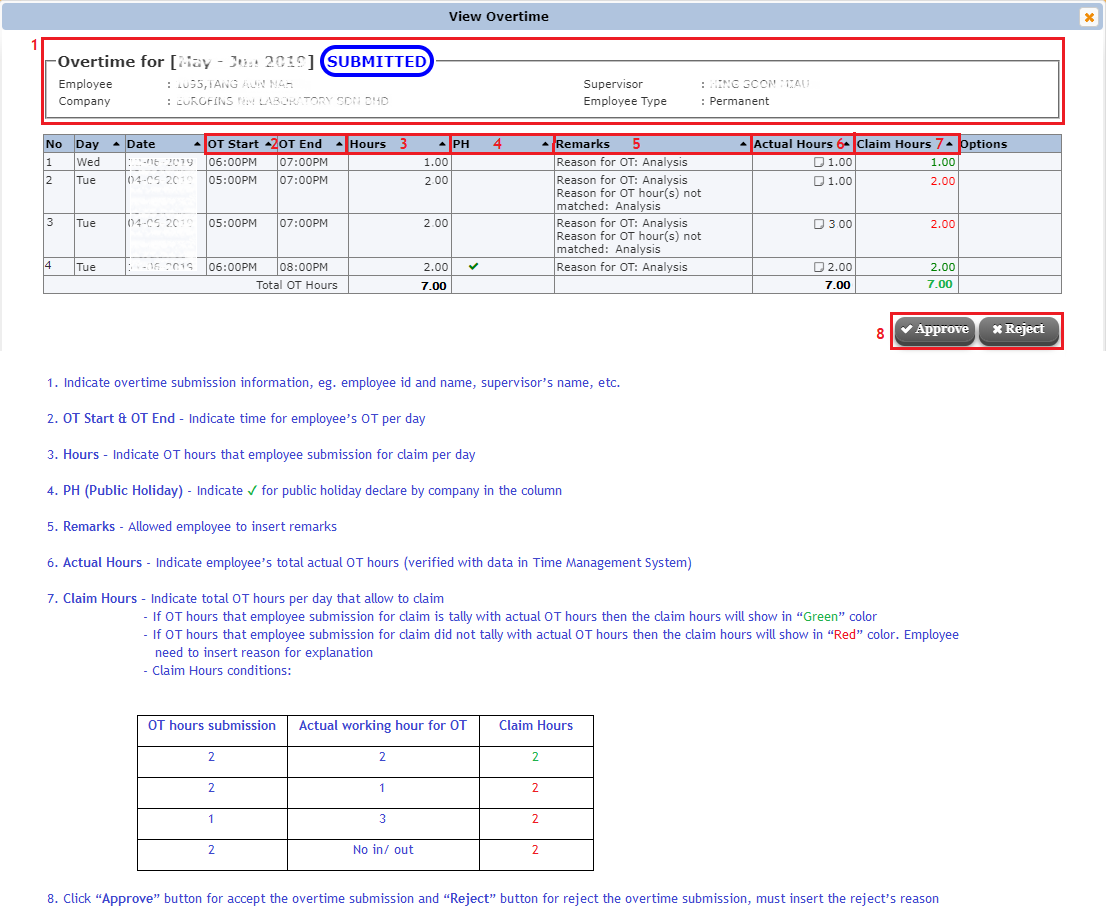
5. Click View at Option column to view overtime details. The Explanation of the View Overtime page:
1. Indicate overtime submission information, eg. employee id and name, supervisor’s name, etc.
2. OT Start & OT End – Indicate time for employee’s OT per day
3. Hours – Indicate OT hours that employee submission for claim per day
4. PH (Public Holiday) - Indicate ✔ for public holiday declare by company in the column
5. Remarks - Allowed employee to insert remarks
6. Actual Hours - Indicate employee’s total actual OT hours (verified with data in Time Management System)
7. Claim Hours – Indicate total OT hours per day that allow to claim
- If OT hours that employee submission for claim is tally with actual OT hours then the claim hours will show in “Green” color
- If OT hours that employee submission for claim did not tally with actual OT hours then the claim hours will show in “Red” color. Employee need to insert reason for explanation
- Claim Hours conditions:
|
OT hours submission |
Actual working hour for OT |
Claim Hours |
|
2 |
2 |
2 |
|
2 |
1 |
2 |
|
1 |
3 |
2 |
|
2 |
No in/ out |
2 |
8. Click “Approve” button for accept the overtime submission and “Reject” button for reject the overtime submission, must insert the reject’s reason
Employee_Supervisor_Timesheet_01